Showing posts with label CRM 2013. Show all posts

Thursday, August 21, 2014

Check Entity and Attribute Exist in CRM or not?

   private bool DoesAttributeExist(string entityName,string attributeName, IOrganizationService service)
        {
            RetrieveEntityRequest request = new RetrieveEntityRequest
            {
                EntityFilters = Microsoft.Xrm.Sdk.Metadata.EntityFilters.Attributes,
                LogicalName = entityName
            };
            RetrieveEntityResponse response
              = (RetrieveEntityResponse)service.Execute(request);

            return response.EntityMetadata.Attributes.FirstOrDefault(element => element.LogicalName == attributeName && element.AttributeType.Value == AttributeTypeCode.DateTime) != null;
        }

        private bool DoesEntityExist(string entityName, IOrganizationService _service)
        {
            RetrieveAllEntitiesRequest allEntitiesRequest = new RetrieveAllEntitiesRequest();
            // Retrieve only the currently published changes, ignoring the changes that have
            // not been published.
            allEntitiesRequest.RetrieveAsIfPublished = false;
            //allEntitiesRequest.MetadataItems = MetadataItems.EntitiesOnly;

            // Execute the request
            RetrieveAllEntitiesResponse allEntitiesResponse = (RetrieveAllEntitiesResponse)_service.Execute(allEntitiesRequest);

            // Iterate through the retrieved entities
            foreach (EntityMetadata entity in allEntitiesResponse.EntityMetadata)
            {
                if (entity.LogicalName == entityName)
                    return true;
            }
            return false;
        }

Thursday, April 24, 2014

How to use ExecuteMultipleRequest with ServiceContext and Linq

The following code is retrieving all the contacts where parent customer id is C6CB814A-BA75-E011-8720-00155DA5304E and updating their phone number.
var ServiceContext = new OrganizationServiceContext(service);
Guid accountid = new Guid("C6CB814A-BA75-E011-8720-00155DA5304E");

// Create an ExecuteMultipleRequest object.
ExecuteMultipleRequest requestWithResults = new ExecuteMultipleRequest()
{
    // Assign settings that define execution behavior: continue on error, don't return responses. 
    Settings = new ExecuteMultipleSettings()
    {
        ContinueOnError = false,
        ReturnResponses = false
    }, 
    // Create an empty organization request collection.
    Requests = new OrganizationRequestCollection()
};
               
requestWithResults.Requests.AddRange(from c in ServiceContext.CreateQuery("contact")
                                    where c["parentcustomerid"].Equals(accountid)
                                    select new UpdateRequest()
                                    {
                                        Target = new Entity("contact")
                                        {
                                            Id = c.Id,
                                            Attributes = { new KeyValuePair<string,object>("telephone1", "+61402234212") }
                                        }
                                    });

// Excute the requests
ExecuteMultipleResponse Response = (ExecuteMultipleResponse)service.Execute(requestWithResults);

Thursday, December 12, 2013

Pass Custom Parameters to an entity form through a URL in CRM 2013

This blog posted back in 2012, described how to pass custom parameters to an entity in CRM 2011. The other day tried to use the same code to make it in CRM 2013 but unfortunately that would not work. You will be able to pass a single parameter through the URL using the same code as before, but to pass more than one parameters, you need to use the new openEntityForm client API.

In 2011, the parameters would be concatenated to make a string and pass that as the extraqs query string

var extraqs = "Parameter_Source=Hello";
extraqs += "parameter_Source2=8";

//Set features for how the window will appear.
var features = "location=no,menubar=no,status=no,toolbar=no";
// Open the window.
window.open(Xrm.Page.context.getServerUrl() +"/main.aspx?etn=account&pagetype=entityrecord&extraqs=" + encodeURIComponent(extraqs), "_blank", features, false);

Using the new client API to open the record, this would now be presented as follows

var parameters = {};
parameters["myparam_test"] = "1";

parameters["parameter_test"] = "100";

//use the openEntityForm to open the record

Introduction to Actions in CRM 2013

Until CRM 4 there were Workflows that could be used for asynchronous processing of business logic, generally used for setting up automated actions and defining sales process in Dynamics CRM.

Since CRM 2011, the workflows became a category under Processes and there was another category Dialogs introduced. Dialogs provided for execution of Dialog scripts to set up process flows for the Salesforce. These could be used to guide the sales people through the sales process using a question/answer format. The Dialog included execution of automated steps like the workflows.

With CRM 2013, the Processes have been extended to now include Business Process Flow and Actions in addition to the categories from the previous versions. In our earlier blog we have discussed the concept of Business Process Flow. This article will concentrate on Actions.

What are Actions?

Actions are messages that can defined for an entity. Existing examples messages include Create, Update, Set State, Assign etc. With Actions, the CRM platform has enabled the creation of custom actions for entities to extend the XRM platform.

Where to use Actions?

An example of a custom action could be “Approve”. Often times we have to design an approval process for Dynamics CRM. Once the item is approved, certain actions need to be performed. In previous versions it would either be implemented as a Workflow that is manually executed from the Workflows Dialog or it involved added of a custom attribute that when checked would imply the item is approved and then the workflow would capture the update of this field to process any automated actions defined.

How to setup an Action?

Let us take an example of an approval process. When an item is “Approved”, we want to send email notifying the concerned parties of the approval. 


Here is an action created for “Approve”

It accepts an input parameter for the ApprovedBy User. You can specify parameters of any of the following data types

These parameters could be defined as input/output parameter.
  
In the workflow actions, it sends a mail from the ApprovedBy user to the Owner of the Order notifying them of the order being approved. You can also call custom workflow assemblies here.

Note the schema name generated “new_Approve”. This is the name of the new message that will not be available for the Order entity.

These actions are available for further implementation of custom business logic through the use of plugins. In some scenarios, say we need to validate certain conditions are met before the item can be approved. In this case we can register a plugin in the Pre-Stage of the Approve Message. The plugin could validate the conditions and throw an exception to abort the processing of the Approve Message.

How to use Actions?

Since Actions are implemented as custom messages/requests, they can be implemented similar to any other OOB messages like Create or Update.

Using C# code, you can invoke the Approve request using the following code                 

                    //get current user details 
                    WhoAmIRequest userReq = new WhoAmIRequest();

                    WhoAmIResponse resp = (WhoAmIResponse) proxy.Execute(userReq);


         OrganizationRequest req = new OrganizationRequest("new_Approve");
                    req["ApprovedBy"] = new EntityReference("systemuser", resp.UserId);
                    req["Target"] = new EntityReference("salesorder",orderid);

                    //execute the request
                    OrganizationResponse response = proxy.Execute(req);
 

Through jscript it can be invoked as follows.
if (typeof (SDK) == "undefined")
{ SDK = { __namespace: true }; }

SDK.Action = {

    _getClientUrlfunction () {      

        var ServicePath = "/XRMServices/2011/Organization.svc/web";

        var clientUrl = "";
        if (typeof GetGlobalContext == "function") {
            var context = GetGlobalContext();
            clientUrl = context.getClientUrl();
        }
        else {
            if (typeof Xrm.Page.context == "object") {
                clientUrl = Xrm.Page.context.getClientUrl();
            }
            else
            { throw new Error("Unable to access the server URL"); }
        }
        if (clientUrl.match(/\/$/)) {
            clientUrl = clientUrl.substring(0, clientUrl.length - 1);
        }
        return clientUrl + ServicePath;
    },
    ApproveRequest : function (salesOrderId, approvedById) {
        var requestMain = ""
        requestMain += "<s:Envelope xmlns:s=\"http://schemas.xmlsoap.org/soap/envelope/\">";
        requestMain += "  <s:Body>";
        requestMain += "    <Execute xmlns=\"http://schemas.microsoft.com/xrm/2011/Contracts/Services\" xmlns:i=\"http://www.w3.org/2001/XMLSchema-instance\">";
        requestMain += "      <request xmlns:a=\"http://schemas.microsoft.com/xrm/2011/Contracts\">";
        requestMain += "        <a:Parameters xmlns:b=\"http://schemas.datacontract.org/2004/07/System.Collections.Generic\">";
        requestMain += "          <a:KeyValuePairOfstringanyType>";
        requestMain += "            <b:key>Target</b:key>";
        requestMain += "            <b:value i:type=\"a:EntityReference\">";
        requestMain += "              <a:Id>" + salesOrderId + "</a:Id>";
        requestMain += "              <a:LogicalName>salesorder</a:LogicalName>";
        requestMain += "              <a:Name i:nil=\"true\" />";
        requestMain += "            </b:value>";
        requestMain += "          </a:KeyValuePairOfstringanyType>";
        requestMain += "          <a:KeyValuePairOfstringanyType>";
        requestMain += "            <b:key>ApprovedBy</b:key>";
        requestMain += "            <b:value i:type=\"a:EntityReference\">";
        requestMain += "              <a:Id>" + approvedById + "</a:Id>";
        requestMain += "              <a:LogicalName>systemuser</a:LogicalName>";
        requestMain += "              <a:Name i:nil=\"true\" />";
        requestMain += "            </b:value>";
        requestMain += "          </a:KeyValuePairOfstringanyType>";
        requestMain += "        </a:Parameters>";
        requestMain += "        <a:RequestId i:nil=\"true\" />";
        requestMain += "        <a:RequestName>new_Approve</a:RequestName>";
        requestMain += "      </request>";
        requestMain += "    </Execute>";
        requestMain += "  </s:Body>";
        requestMain += "</s:Envelope>";
        var req = new XMLHttpRequest();
        req.open("POST", SDK.Action._getClientUrl(), false)
        req.setRequestHeader("Accept""application/xml, text/xml, */*");
        req.setRequestHeader("Content-Type""text/xml; charset=utf-8");
        req.send(requestMain);
        //work with the response here
        //var strResponse = req.responseXML.xml;       

    },
    __namespace: true
};
   

Here in this above script RequestName indicates the Unique Name of Action and Parameters contains collection of key value pairs that can be passed to Action. In above script We can use below function using below syntax.
SDK.Action.ApproveRequest(salesOrderId, approvedById);

You can register plugin on the Approve message. The input parameters of the Approve message will receive the input parameters as defined in the Approve Action.

The plugin registration tool will start showing this message for the Order entity to register plugin against.


Once the plugin is registered, in the code you can access the input parameters just like you do for other messages as shown below 


To get access to the image of the Order record


EntityReference entityRef = localContext.PluginExecutionContext.InputParameters["Target"] as EntityReference;


To read the ApprovedBy input parameter


EntityReference approvedBy = localContext.PluginExecutionContext.InputParameters["ApprovedBy"] as EntityReference;


In the pre-stage, you can throw an InvalidPluginExecution error to abort the Approve operation.


Conclusion:

 Actions is a powerful tool in the hands of the developer to truly extend the CRM platform for XRM implementations.
  

Wednesday, November 6, 2013

How to restore a hidden button on the CRM 2013 Command Bar

The new Dynamics CRM 2013’s command bar has deliberatly limited space for buttons due to the ‘intentionally constrained’ user interface design. The idea being that if you limit the space for buttons, then designers will be forced to only show those that are absolutely necessary and the user experience will be improved. As result, many of the buttons from the CRM 2011 Ribbon Bar have been removed from the CRM 2013 Command Bar.
The CRM2011 Ribbon Buttons are still there, but hidden using a new RibbonXml Display Rule named 'Mscrm.HideOnCommandBar'. This article shows you how to restore those buttons to the Command Bar that your users absolutely must have using the Ribbon Workbench for CRM2013.
1. Create a solution containing the entities that you wish to restore buttons for. This example uses the ‘Case’ entity, and we are restoring the ‘Connect’ button on the ‘Form’ command bar.
Before customising, the Form Command Bar looks like the following:
You’ll notice that only 5 buttons are shown until buttons are added to the ‘overflow’ menu. The ‘Connect’ button is not here since it was deemed unessential.
2. Open the solution containing the Case entity in the Ribbon Workbench for CRM 2013 and select the ‘incident’ entity if not already selected. You will see by default the Command Bar is selected.
 
3. In order to locate the button we want to restore, click on the ‘Ribbon’ selector to show the Ribbon. This will show the Ribbon Design surface.
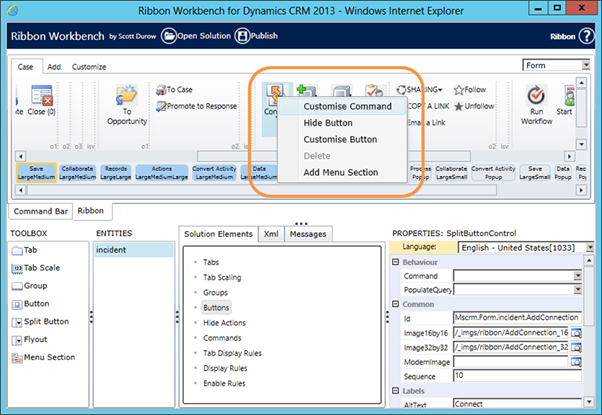
4. Select the ‘Form’ ribbon using the dropdown on the top right of the design surface, then select the ‘Connect’ button and Right-Click ‘Customize Command’
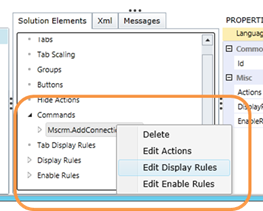
5. Locate the Customised Command in the ‘Solution Elements’ tab under ‘Commands’
6.  In the Edit Display Rules dialog, select the ‘Mscrm.HideOnCommandBar’ rule and click the ‘<Remove’ button.
7.  Important: Locate the following Display Rules, and set the ‘IsCore’ property to ‘True’ – this will prevent them from being customised as well:
a.      Mscrm.HideOnCommandBar
b.      Mscrm.CreateConnection
c.      Mscrm.IsConnectionsEnabledPrimary
d.      Mscrm.HideOnModern
8. Important: Locate the ‘Mscrm.FormStateExistingOrReadOnlyOrDisabled’ Enable Rule, and set the ‘IsCore’ property to ‘True’
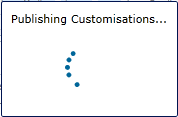
9. Click ‘Publish’
10 Now when you refresh the Case Form, you will see the Connect button again.
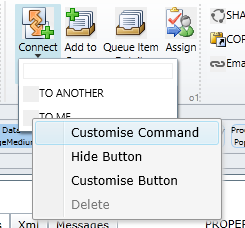
11  You’ll notice that only the default button is shown – so if you use the drop down, you’ll only get the ‘Connect to Another’ option. To enable the ‘To Me’ button repeat the process for the ‘To Me’ button:
Remember to make sure that only the buttons that are really needed are included - the Command Bar has been constrained intentially to give your users the best experience.

Thursday, October 17, 2013

CRM 2013 NEW FEATURES: JAVASCRIPT NOTIFICATIONS

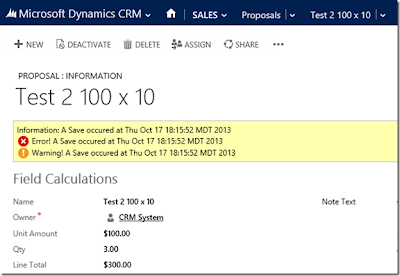
RM 2013 come with a set of new JavaScript functions that we can use for sending notifications to the user.  There are form notifications and field notifications.  Here’s an example of a form notification at work…
The function below was registered on the OnSave event of my form.   It notifies the user that a Save has occurred and timestamps the notification.  I post 3 notifications to demonstrate the 3 different types available (error, warning and information):
function NotifyOnSave() {
    var today = new Date();
    Xrm.Page.ui.setFormNotification('Error! A Save occured at ' + today, 'ERROR');
    Xrm.Page.ui.setFormNotification('Warning! A Save occured at ' + today, 'WARNING');
    Xrm.Page.ui.setFormNotification('Information: A Save occured at ' + today, 'INFORMATION');
}
Here’s what appears after the Save:

It’s a little hard to tell on the screenshot but what has happened is each of those 3 notifications has been posted a second time to the form (note: the UI only shows 3 rows of notification, the user has to scroll down to see the other 6 notifications).  The Information notification appears twice due to the sort order applied by the UI:  Information notifications first, then Error notifications followed by Warning notifications.   This is the default behavior  of setFormNotification().   We have options though, we can assign each notification a unique ID and then we can overwrite a previous notification and avoid duplication in a scenario like this.  Here’s the revised JavaScript (note the unique ID added as a 3rd parameter):
function NotifyOnSave() {
    var today = new Date();
    Xrm.Page.ui.setFormNotification('Error! A Save occured at ' + today,'ERROR','1');
    Xrm.Page.ui.setFormNotification('Warning! A Save occured at ' + today,'WARNING','2');
    Xrm.Page.ui.setFormNotification('Information: A Save occured at ' + today,'INFORMATION','3');
}

If you want to clear a notification you use clearFormNotification() and you identify the notification by its unique ID:
    Xrm.Page.ui.clearFormNotification('1'); 

We also get field notification in CRM 2013.  The syntax for these is:
Xrm.Page.getControl(fieldName).setNotification(message);